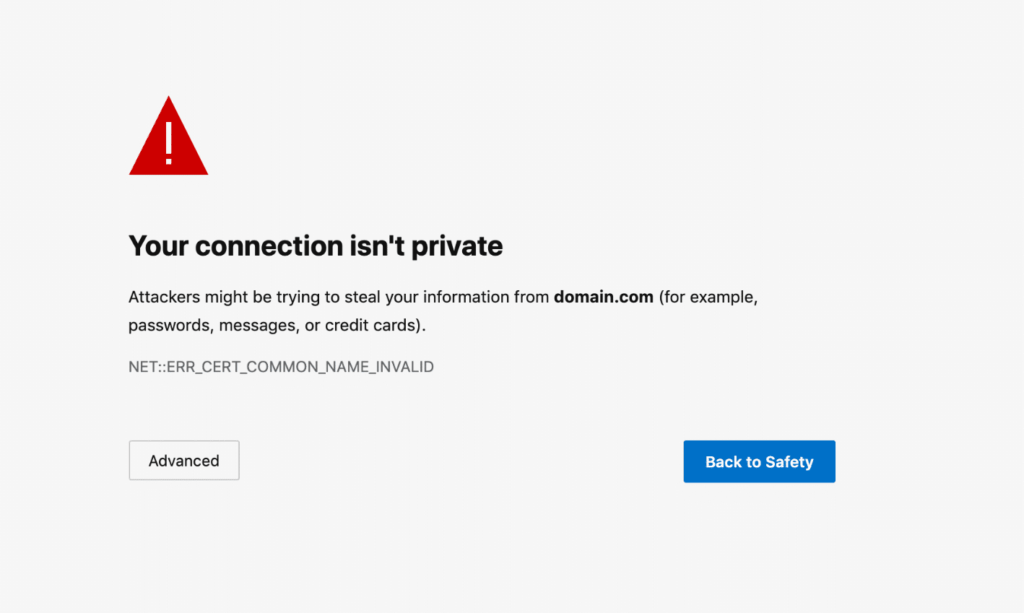
How to Fix “Your Connection is Not Private” Error: A Step-By-Step Guide

We’ve all come across this error while browsing the web but if you’re getting it on your own website, you’re probably wondering how to fix it. Getting a warning message saying “Your connection is not private” isn’t very reassuring, particularly if you’re running an eCommerce site or taking client or customer details via your site.
Luckily, getting rid of this dreaded error is usually a quick and easy fix.
In this step-by-step guide I’ll walk you through exactly what you need to do to ensure your website is error free and your website users have a smooth experience browsing your site.
What Causes the “Your Connection is Not Private” Error?
Firstly, what’s this error all about anyway?
Less tech-savvy users might assume that someone is trying to snoop on them while they’re browsing your site. This probably isn’t the case but it can certainly be very off-putting.
In fact, modern web browsers won’t even load your site if it’s throwing this error. This is a safety feature to prevent web browsers from entering personal or payment details on an unsecure site.
This error will only occur on sites that are running on HTTPS or should be running on HTTPS.
You may have noticed that these days many websites have https:// in front of their domain name instead of http://.
The extra “s” stands for secure, and is a way to ensure that all data sent between a web browser and a website is secure and cannot be intercepted.
To ensure this, websites using HTTPS encrypt data while it’s being transferred. They can prove their using this secure protocol by sending something called an SSL certificate to your browser. This is usually indicated by a padlock icon in the address bar of the browser.
It’s important for sites to use HTTPS if users are transmitting any kind of sensitive data such as payment details or logging into a site that stores their private data in any way.
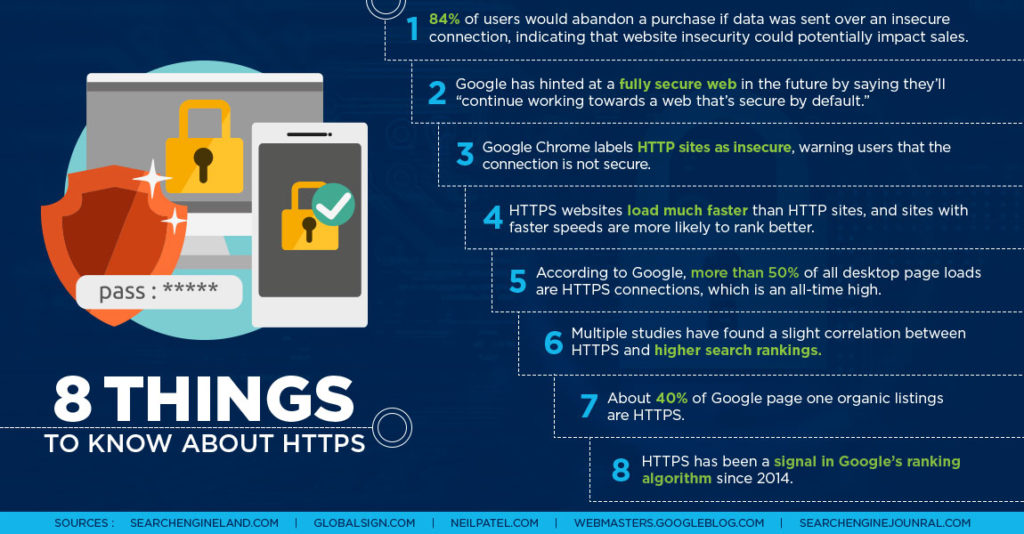
While some sites may not need to use HTTPS, these days it’s generally considered best practice to use it. This is not only for general security reasons, but also because HTTPS sites tend to rank higher than HTTP sites in the search results.
How to Check if Your Site Has is Using HTTPS
Not sure if your site is using HTTPS or just plain HTTP? Just type in your site domain to your browser (mysite.com, not http://myssite.com or https://mysite.com) and look in the address bar when it loads. Different browsers display a site’s security certificate information in slightly different ways.
In most modern browsers you won’t see http:// or https:// before the domain name but you’ll see a small padlock icon if the site is using SSL and an alert icon with “Not Secure” if it’s not.


In Safari you’ll see a padlock icon if the site is secure and nothing if it’s not. Opera uses a small triangle alert icon for insecure sites
You can also copy and paste the URL from the browser into notepad to see if it’s using HTTP or HTTPS.
You won’t get an error just because your site is using HTTP. However, if someone links to your site using HTTPS when it doesn’t have a security certificate (which is quite likely, as most sites use HTTPS these days), it will throw the “Your connection is not private” error when the browser tries to load the site. You might also get errors if you’re linking to images or other assets with the wrong protocol.
So basically, if you’re not already using HTTPS, the only way to fix this error is by installing an SSL certificate on your site.
How to Change Your Website From HTTP to HTTPS
To use HTTPS, sites must have a digital certificate to prove that they are up to current security standards. This “SSL” certificate is sent by a website when it’s accessed by a browser. The certificate contains a “key” which is used to encrypt data in transit.
These days most web hosting companies will provide SSL certificates either for free or for a fee. In this case it’s usually just a case of making sure your website is setup correctly at the back end to use them. Check your host knowledgebase or ask support about how to move your site to HTTPS.
If your web host doesn’t provide a free security certificate, you can get one from Let’s Encrypt or Cloudflare.
How to Fix the “Your Connection is Not Private” Error
If your site is already setup to use HTTPS, it means something has gone wrong somewhere. There might be a problem with your certificate such as it being out of date, or it might not be loading properly.
There are a few different reasons why this error might be coming up so the best thing to do is try out each of these steps in order until the problem is fixed.
It may just be a temporary glitch or it may be a warning that your website really is insecure. Either way, you can normally get this issue sorted out pretty quickly.
1. Reload the Site
Sometimes the simplest fix is the one that works. Web browsers and websites are unpredictable creatures and sometimes this error can be caused a browser failing to send a request to the server or another glitch.
Wait a few moments and refresh the page in your browser. If the error has gone, you don’t need to read the rest of this guide. Otherwise, proceed to step 2…
2. Make Sure the Date and Time of Your Device Are Correct
SSL certificates don’t last forever. They have expiry dates. If your computer is set to the wrong date or time, this might cause a conflict with the expiry date of the SSL certificate, causing it to appear invalid.
If you do have the wrong date or time fixed, change it so it’s correct and try reloading the site.
3. Try Incognito Mode
Putting your browser in incognito mode will load your website as if you’ve never visited it before. It will also disable any browser extensions you’re using that may be causing conflicts.
If you’re still getting the error when you load your site in incognito mode, this means the problem is probably with the site itself. However, if the site loads with no error when you’re in incognito mode, it means the issue is with your browser or device.
4. Clear Browser Cache and Cookies
If your site is loading correctly in incognito mode, the error may be because your browser is caching an old version of the security certificate.
Clearing this data will force your browser to re-request the SSL certificate.
The process for clearing your cache varies slightly depending on what browser and device you’re looking for, but you should be able to find it somewhere in the menu or settings labeled as “clear cache”, “clear cookies or site data” or “clear browsing data”. You may need to clear your cache and cookies separately.
Note, doing this will log you out of any websites you’re logged into and clear any stored passwords so you’ll have to log in again.
5. Check Your Connection
Some public Wi-Fi networks are not configured properly to use HTTPS. This can cause your browser to display an error saying the site is not secure.
If you’re using the w-fi in a public place like a café or airport, this error might occur because you’ve not logged into the portal screen and accepted the terms and conditions of using the Wi-Fi connection.
To fix this, try re-opening your browser and visiting Google or any big website to force the portal to pop up again. Make sure you sign in or accept the terms and conditions before trying to load your site again.
You can also try using data instead if you’re using your phone, or moving to a different location.
6. Turn Off your VPN and antivirus software
Sometimes, security software can incorrectly block SSL certificates from loading properly. To check if this is the case, try turning them off temporarily and re-loading the site.
In the case of your VPN software causing the issue, try connecting to a different server.
If this fixes the problem, contact the customer support of the software you’re using for advice on how to eliminate the issue permanently.
7. Restart Your Browser and Device
There’s a good reason that the most common suggestion from IT support for any technology is “try turning it off and on again”.
Close your browser completely and make sure it’s not running in the background before re-opening it. If this doesn’t make any difference, try rebooting your computer or mobile device.
It’s a pain to restart your device, especially if you have lots of applications running, but doing a hard reset will force your computer or mobile device to clear caches and temporary files that might be causing errors.
8. Try a Different Device
If you’re using an old computer or operating system, it might not be compatible with modern security technology.
If this is the case, update your operating system or try your website on a different device.
You can also try asking a friend or family member to load your site and see if they’re getting the error too.
9. Try Changing Your DNS Servers
Sometimes this error can occur if you’re using the free public DNS provided by Google or Cloudflare.
To see if this is the issue, go into your computer’s internet settings and remove any DNS servers you’ve specified (8.8.8.8 and 8.8.4.4 for Google and 1.1.1.1 and 1.0.0.1 for Cloudflare)
On Windows, you’ll find this setting in your network connection properties. Tick the box to “Obtain DNS server address automatically”.
On Mac, the DNS settings are in System Preferences under “Network”. Choose your network connection, click the “Advanced” button, and then the ‘DNS” tab. If you’ve specified DNS servers in the box, remove them by selecting one at a time and clicking the minus button.
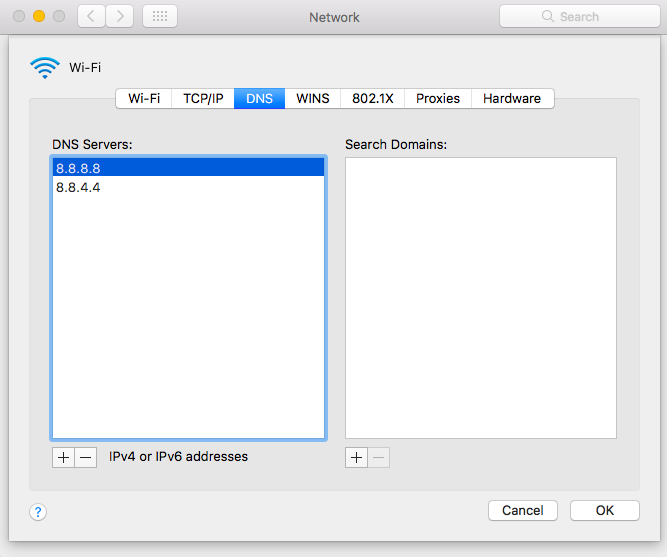
This will revert you back to your ISP’s DNS servers. You may also need to change your DNS settings on your router.
10. Check to See if Your Security Certificate Has Expired
If none of these tips fixed the issue, it may be the case that your site’s SSL certificate has expired without your knowledge. This usually happens because you’ve disabled the auto-renew function or because your payment has failed.
You can check the expiration date of your website in your browser.
In Chrome you can easily do this by clicking the padlock icon in the browser address bar and then clicking “Certificate”. This will show you if the SSL certificate is valid and the time and date it expires.
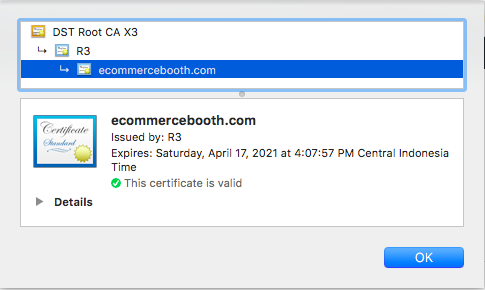
If your certificate has expired, log into the backend of your website or the third party provider of your SSL certificate to see if you can renew the certificate.
11. Check All Versions of Your Domain
It may be the case that your certificate is not configured properly to work with all versions of your domain.
This means that when you go to www.mysite.com, the certificate will load correctly, but you might get an error if you just go to mysite.com or vice versa.
You should also check any subdomains you’ve set up like blog.mysite.com
If the certificate isn’t loading for all versions of your domain, you can either generate a new certificate for all variations of your domain or set up a redirect in your .htaccess file. If you’re not sure how to do this, contact your webhost for further instructions.
12. Run an SSL Server Test
There are free third-party services available that will test if your SSL certificated is set up correctly.
To do this test, go to https://www.ssllabs.com/ssltest/ and enter your domain name.
After a few moments, you’ll get a detailed report showing the details of your certificate, which might give you an idea why you’re getting an error.
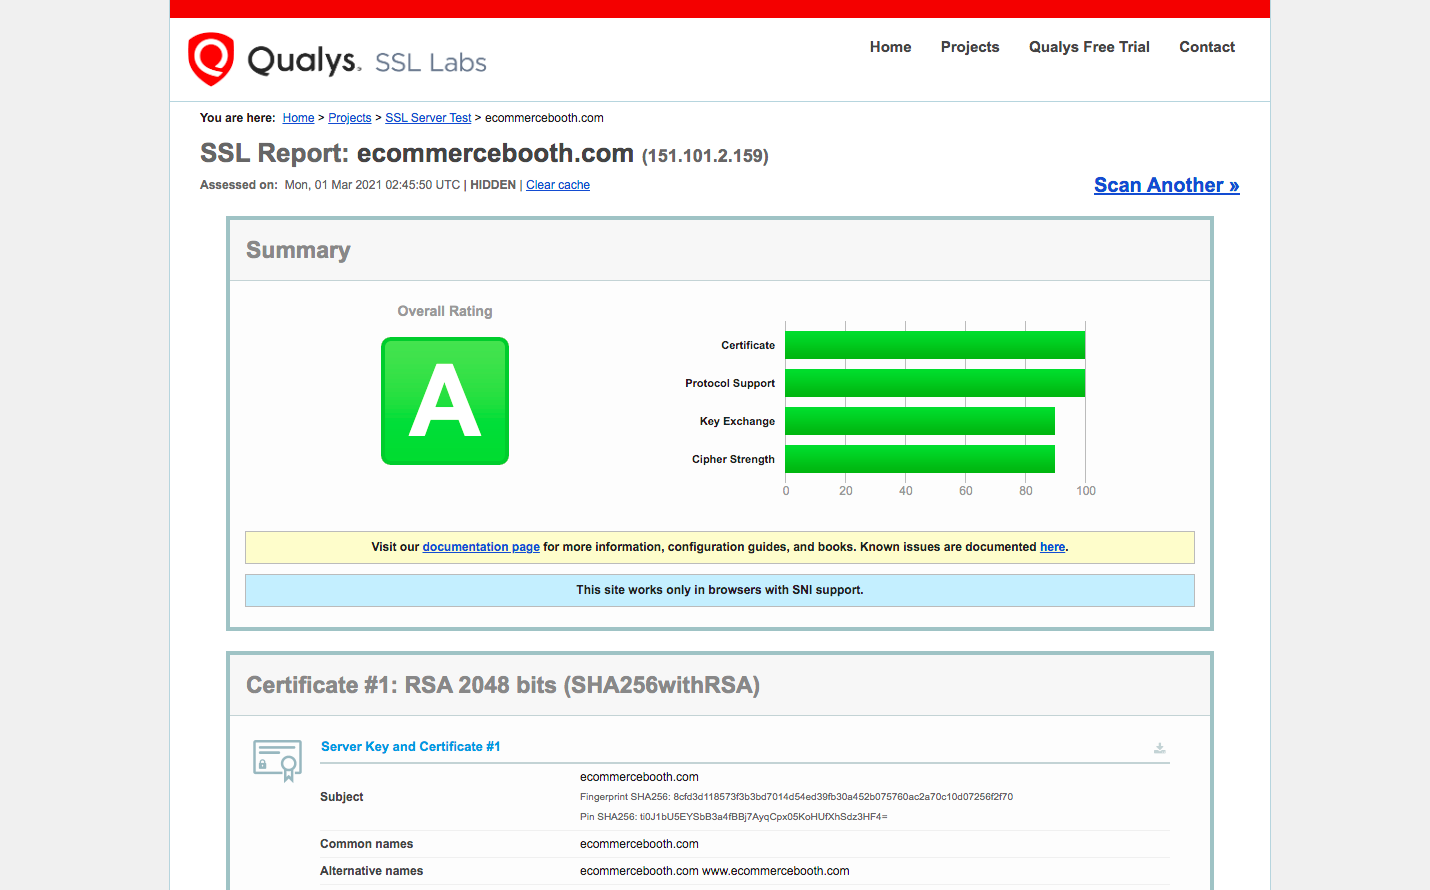
If you get less than an “A” grade, you can probably make some changes to make your site more secure. Contact your web host or certificate provider for further advice.
13. Contact Your Web Host for Advice
If you’ve tried all the above steps and your site is still showing an error, it probably means that there’s a problem with your site.
In this case, it’s time to get in touch with the technical support team for your website to see if they can figure out what’s causing the problem and get it fixed.
Leave a Reply