How to Get a Free Email Domain (Step by Step Guide) – 2021

If you want to use your email for business or to promote your brand or freelance services, registering your own email domain looks a lot more professional than using Gmail or Hotmail.
You might think it’s expensive to get set up with your own branded email but it’s actually very easy to get a free email domain.
What is an Email Domain?
First, let’s be clear what exactly we’re talking about when we say “email domain”.
You probably know what a domain name is – it’s what you type into a browser to go to a website. For example, the domain of this website is ecommercebooth.com.
Domains aren’t just for websites though, and in fact you don’t even need a website if you want to use one. You can get a domain and use it just for your email address – let’s say me@myfunkydomain.com or you can use it for both your email and website.
While you can buy a domain, it’s very easy to get one for free. Why pay for something when you can get it for free?
How to Get a Free Email Domain With Bluehost
There are lots of web hosts that will give you a free domain when you sign up for web hosting but we recommend Bluehost.
Bluehost offers very affordable hosting packages starting at just $2.95 a month and great support. Even the cheapest hosting packages they offer come with 5 email accounts with 100MB of space on each account.
This means you could set up several email accounts for different purposes. Don’t want to clog up your inbox with newsletters and promotions? Or want to keep your work email separate from personal? You can easily set up a different email address for each.
Bluehost also doesn’t hold your domain hostage if you decide to switch to a different provider. In other words, it’s quick and easy to move your domain and email to a different company in the future if you choose to do so.
Step 1: Go to Bluehost
Click here to visit Bluehost.com (the link will open in a new tab so you won’t lose these instructions).
You’ll see links in the menu for “Domains” and “Email” but don’t click either of these. You’ll end up paying for your domain and email instead of getting them for free.
Instead, click the blue “Get Started” button on the homepage.

This will take you to a page where you can choose a hosting package.
You might be thinking “but I don’t want webhosting, I just want an email address!” It seems counter-intuitive, but Bluehost’s cheapest hosting package that also comes with a free domain and free email service and storage is cheaper than most standalone email services.
For example, Google custom email costs $4.20 per user per month, Microsoft 365 Email Essentials starts from $2.99 per user per month, and ProtonMail starts from 4.00 € a Month
Bluehost’s Basic hosting package costs $2.95 a month and your email domain is free for the first year. Plus you also get the opportunity to set up your own website without paying anything more.
You don’t need to have a website but you could use it to set up your own blog, portfolio, business page, online shop, or online resume at any point in the future without paying any extra.
You can also upload files to your website and use it a bit like your own personal cloud storage service. Want to send a file that’s too big to email? Just upload it to your website and put the link in your email instead.
Step 2: Choose Your Hosting Plan
The next step is to choose your hosting plan. You’ll get a free domain and email with any package so you can suit whichever suits your needs best.
If you don’t really need a website or you can’t imagine ever needing more than one website, go ahead and choose the cheapest “Basic” package.
If you think you might want to set up more than one website, you choose the Plus or Choice Plus plans, which also come with Free Office 365 and some other features.
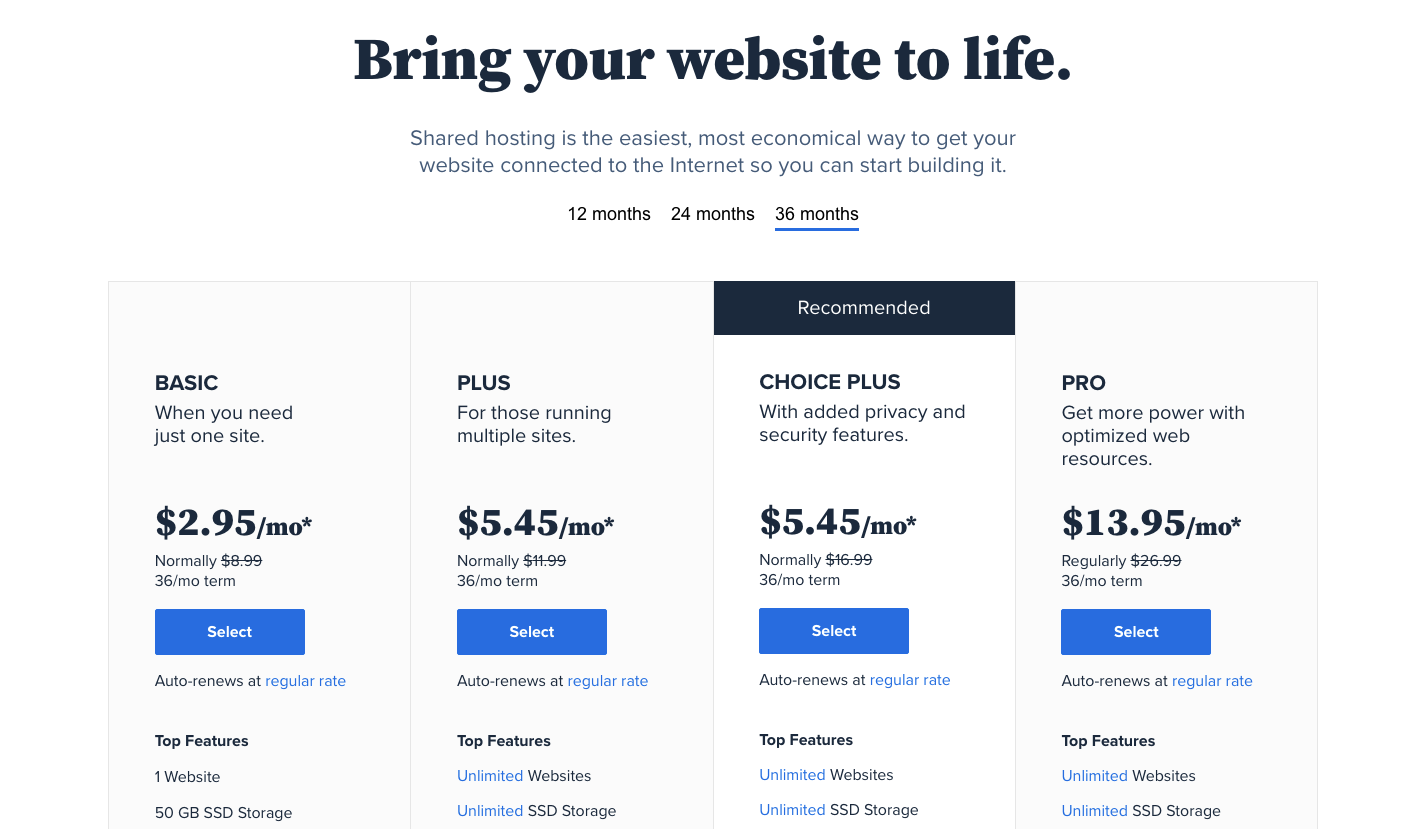
The price shown is applicable if you sign up for 36 months of hosting. You can also sign up for a year or 24 months, which costs a little more per month. You can toggle through to see the prices by clicking the links at the top of the table of plans.
Select the package you want and you’ll be taken straight to a page where you can choose your domain.
Step 3: Choose Your Domain
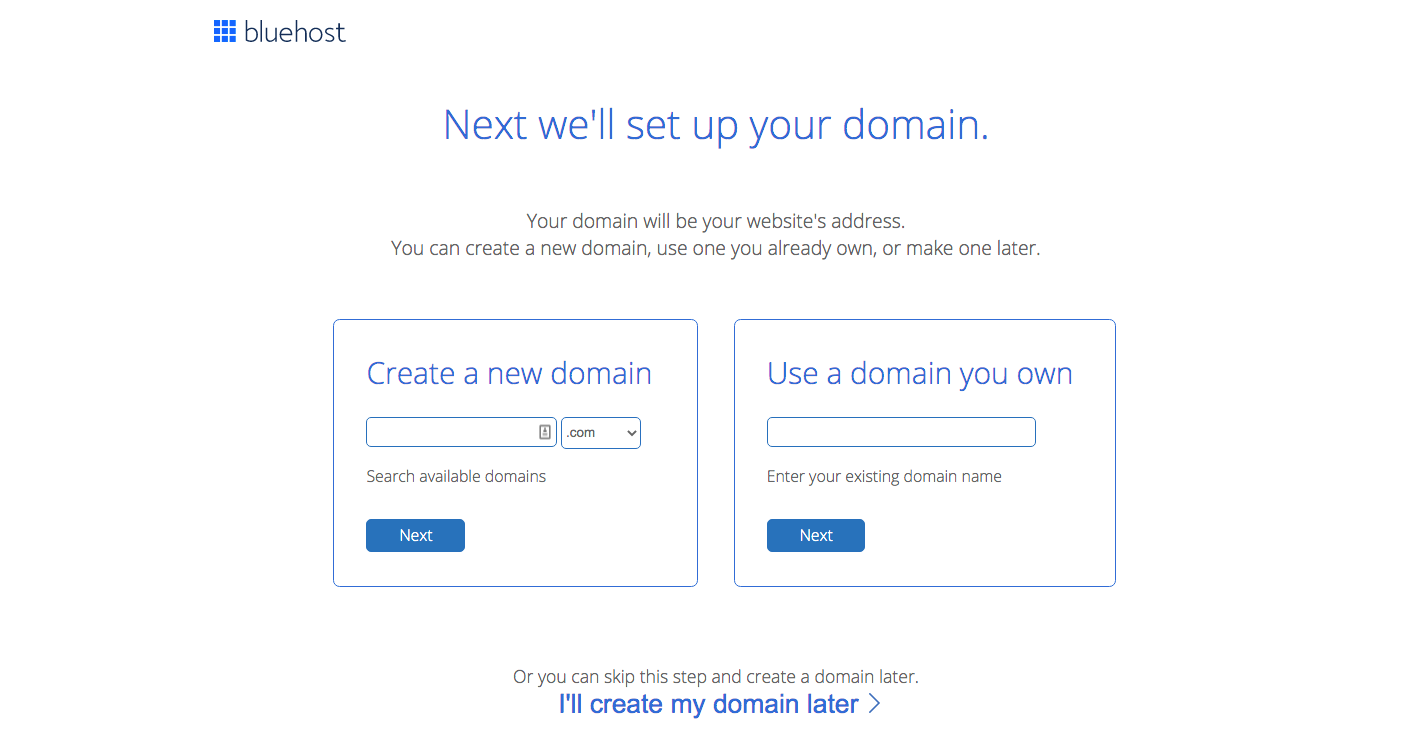
Just enter what you want in the box under “Create a new domain” and choose the extension.
Remember this is just for setting up your root domain, not your whole email address (you’ll do this later). So for example, you’d enter “myfunkydomain” and not me@myfunkydomain.
You have a choice of domain extensions, which include:
- .com
- .online
- .site
- .website
- .space
- .tech
- .store
- .blog
- .net
- .org
- .info
- .co
- .us
- .biz
- .club
In most cases it’s best to choose .com (unless you’re setting up an email for a non-profit or similar organization, in which case .org would be more suitable).
The only other reason to choose a different extension over .com is because the domain you want is already taken and you have your heart set on that domain.
When you click the “Next” button, Bluehost will check to see if the name is available. Hopefully it is and you’ll be taken to the next step of the sign up process.
However you might get a message that the domain you choose is unavailable. If this is the case, Bluehost will suggest some similar domains that you might want to choose instead. You can choose one of these or scroll down and try another domain.
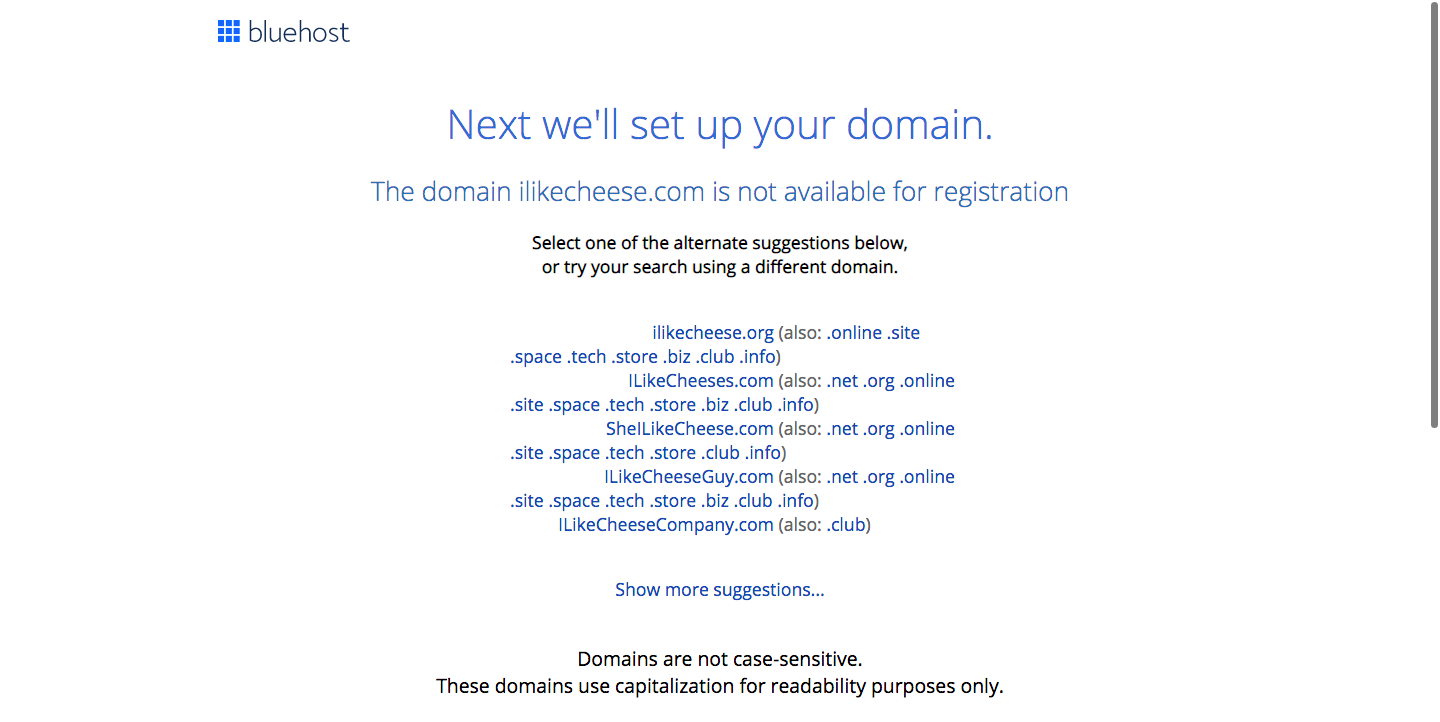
Alternatively, you can scroll down and click the link “I’ll create my domain later” if you want to have a think about it first.
Once you’ve decided on a domain (or skipped it), you’ll be taken to a form to fill out with your account information.
Step 4: Create Your Account
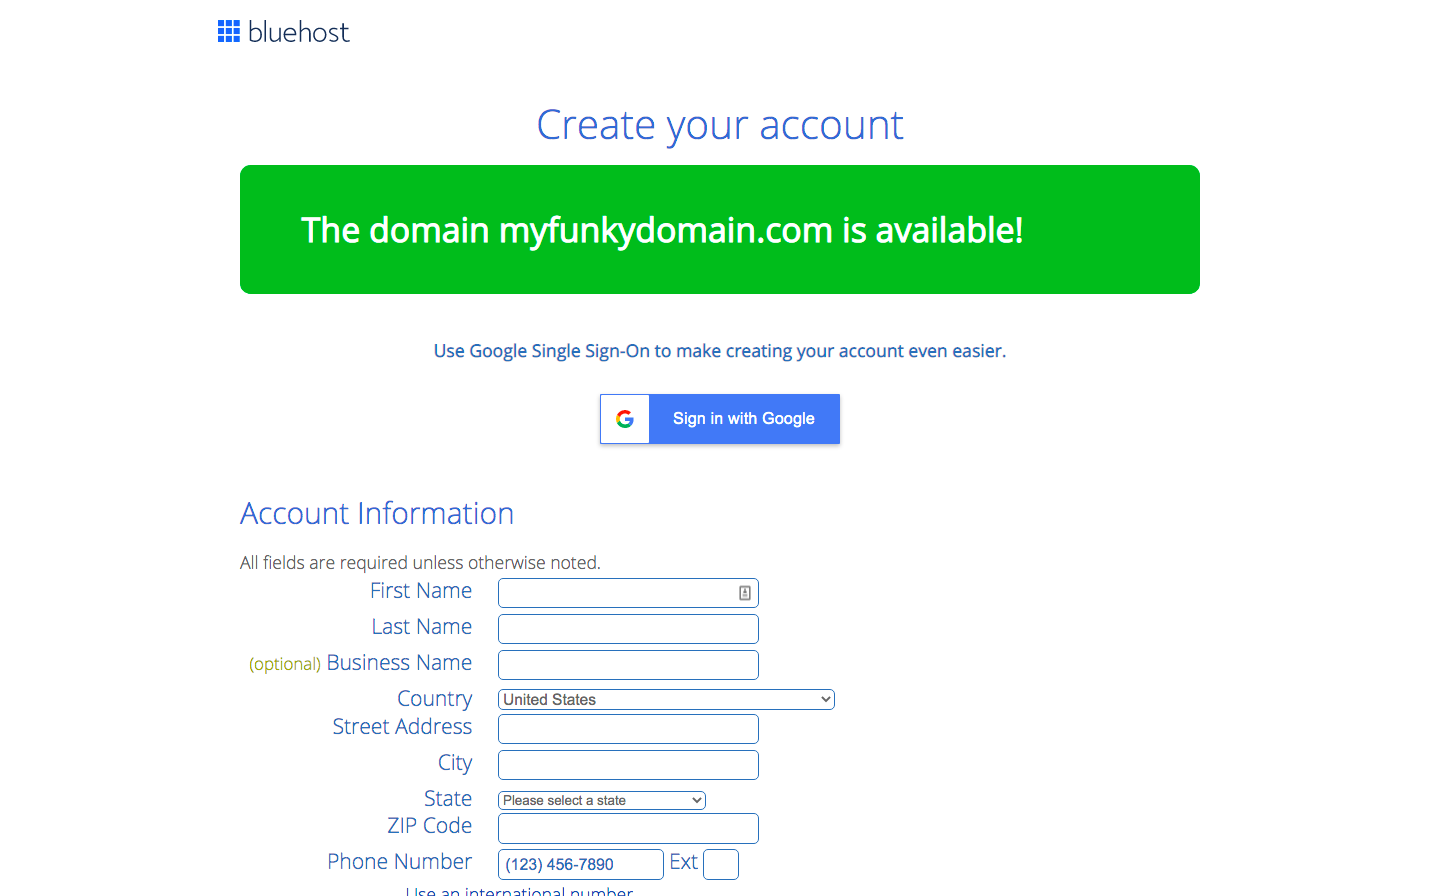
Fill out your name and address details and check that you’ve chosen the right hosting plan. You’ll be able to see the total price and also that your domain registration is included for free.
You can also choose some optional extras on this form. Most of these won’t be of any use to you unless you’re setting up a website, but there are a couple that are worth considering.
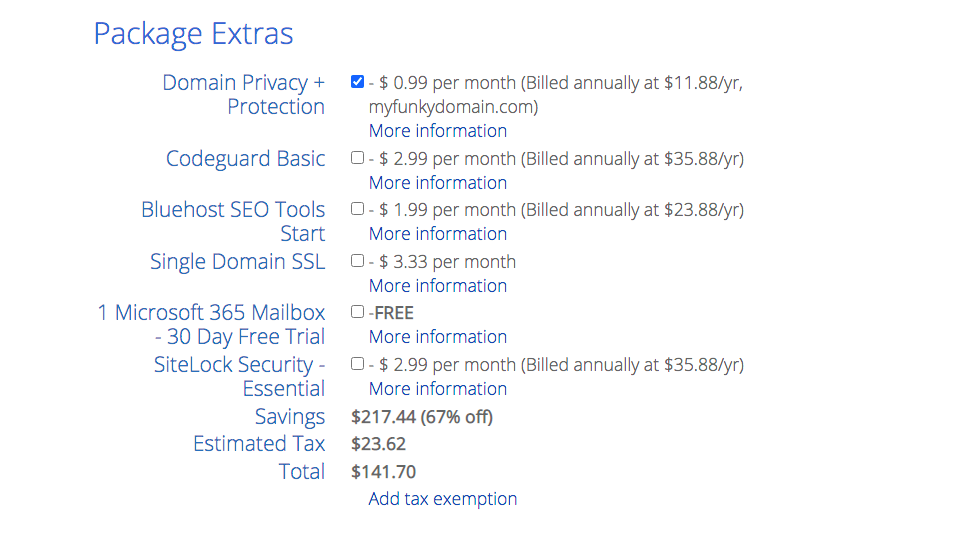
Firstly, domain privacy and protection is a way to prevent individuals from accessing publicly-accessible records that show the contact details of the person who purchased a domain.
If you want your email to be anonymous, you should select this option. It costs an extra $0.99 a month.
The other optional extra you might want to consider is a Microsoft 365 mailbox. You don’t need this as you get a free mailbox with your hosting account, but it upgrades your account to “business” email with more storage space and online calendars. Most people won’t need this option but you might want to try it out for 30 days for free if you’re using email for business.
Once you’ve chosen your extras, it’s just a case of putting in your payment information and hitting the “Submit” button.
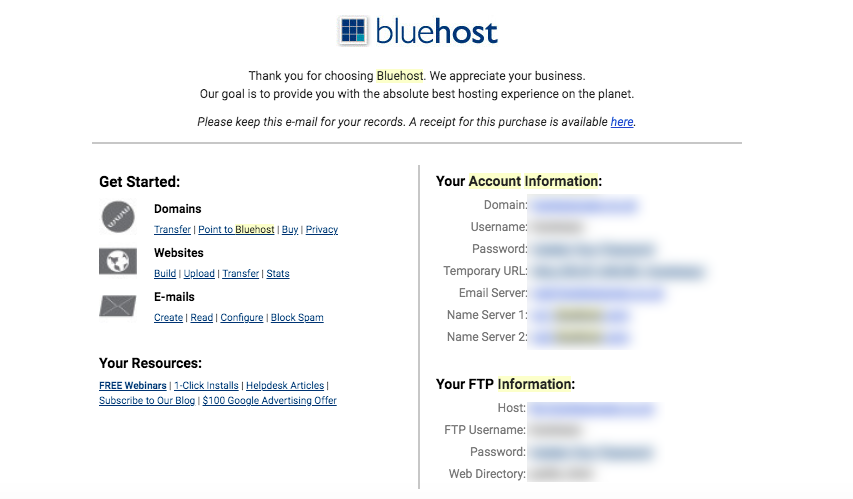
You’ll get an email confirming your order and a welcome email with your username and login details.
Step 5: Setting up Your Email
Congratulations! You’re now the proud owner of your very own domain!
However, there is still a little bit of setup work to do to get your email up and running the way you want it.
Log into your Bluehost account with your domain and password (you should have been sent a link to reset your password in your welcome email from Bluehost).
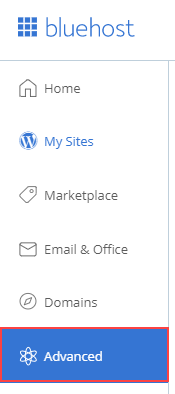
Click the “Advanced” tab in the navigation menu on the left of your screen. This will take you to your cPanel administration panel.
Scroll down to the “Email” section and click the “Email Accounts” icon.
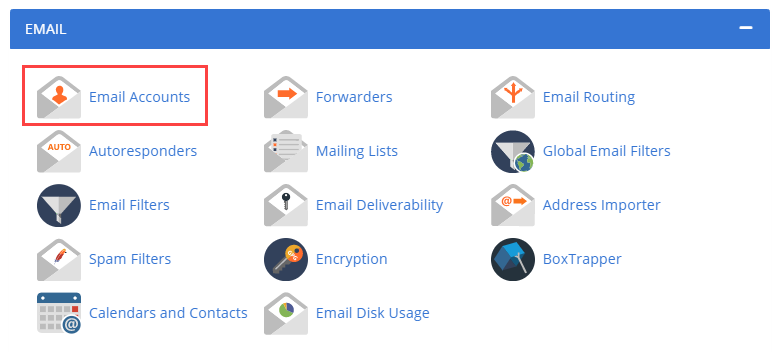
Then click the “Create” button to create a new email inbox.
You can then enter a username, password, and change the mailbox quota if you wish.
You can add up to 5 different mailboxes (email addresses) to your account and the usernames can be anything you want. So for example, you could set up:
- bob@myfunkydomain.com
- work@myfunkydomain.com
- promos@myfunkydomain.com
- newsletters@myfunkydomain.com
- susan@myfunky.domain.com
You can use your mailboxes for filtering and sorting your email or set up email addresses for multiple members of your family.
Each account will be totally separate and have its own address and password. So for example, if you’re setting up family email addresses, each user will only have access to their own mail and won’t be able to access email sent to the other addresses.
You can access your email via webmail, set up the email client on your device to check your email account, or connect it to Gmail. There are instructions for how to do all this in the Bluehost knowledgebase.
Other Ways to Get a Free Email Domain
Several web hosts offer free email and domains when you buy a hosting package so if for some reason you don’t want to sign up with Bluehost, you could get a free email domain with another host like Dreamhost, Inmotion Hosting, or Hostgator. Make sure to check our deals page for current hosting coupon codes first.
An alternative to buying a traditional hosting account is signing up with a website builder. Wix and Weebly both offer free domain names and personalized email on certain plans.
There are also a few websites around that offer free email domains with lesser-known email extensions like .tk, .ml, and .ga. While these services can seem attractive because they’re completely free with no need to buy hosting, if you take a look at the reviews you’ll see lots of unhappy customers and the word “scam” mentioned more than once or twice. These websites are best avoided.
Email Domain FAQs
No, it’s not necessary to have a website. You can register a domain without buying hosting or setting up a website. However, pretty much the only way to get a free domain is to buy some kind of hosting.
Using a custom email domain makes your communications look more professional and helps to grow your brand. This is especially important if you’re running a business, as many consumers won’t trust companies that use free Gmail or Hotmail addresses as their point of contact.
Yes, it’s easy to set up Gmail to pull in email sent to your own custom email address. You can also add multiple email accounts to one Gmail account and manage them all in one place.
If you choose to get your free email domain through Bluehost, you get set up 5 email addresses. For business and premium email services you can usually set up as many email addresses as you want.

Leave a Reply