WooCommerce Personalization: How to Use Logic Hop for Dynamic Content

If you want to improve the shopping experience on your WooCommerce store and sell more products, finding ways to personalize your store’s content is one of the best things you can do.
Instead of creating one static site for all shoppers, you can personalize your site based on each individual shopper. For example, you can:
- Show product recommendations based on the products a person has already viewed or purchased.
- Offer special coupons or promotions based on a visitor’s shopping or browsing history.
- Show certain products to visitors in warm climates and others to visitors from cold climates.
- Display special promos or offers for people who clicked on a certain ad or came from a certain referring site.
This kind of personalization just flat out works for eCommerce – ~80% of shoppers prefer personalized shopping experiences and stores that do personalize content experience an increase in sales.
But how can you personalize WooCommerce content, especially if you’re not a developer?
That’s the topic of this tutorial…
In this guide, we’ll show you step-by-step how to personalize your WooCommerce store with dynamic content using the Logic Hop plugin.
Logic Hop offers an easy, code-free way to personalize your store. It integrates into your existing content editor to let you easily set up your own dynamic content rules.
You can set up rules-based display conditions using a simple interface like this:
Then, you can easily use those conditions right inside your content editor or page builder – no code needed:
Ready to learn how it works? Let’s get personalizing…
WooCommerce and Logic Hop: Here’s What You Can Do
Logic Hop lets you personalize any content on your WordPress site – it’s not limited to WooCommerce.
Here are some of the most useful things that it lets you do:
- Show different content based on a shopper’s purchase or viewing history, as well as other details like their physical location, referring source, and lots more.
- Show recommended products that are unique to each shopper. Again, you can base these on their purchase/viewing history and other details.
- Offer coupons to shoppers who meet certain conditions. For example, you could display a special coupon if a shopper adds a certain item to their cart or visited your site from a certain ad campaign.
At a high level, Logic Hop basically lets you set up IF/THEN conditions for displaying certain content on your store.
For example…
- IF a person purchased Product A in the past.
- THEN show “this specific set of related products” instead of the default set of products that other people see.
You can set up as many rules as you want and you can use as many rule conditions as needed.
WooCommerce Personalization Rules
In terms of WooCommerce-specific rules, Logic Hop lets you personalize content based on the following details:
- Products viewed
- Category of products viewed
- Products purchased
- Category of products purchased
- Product in shopping cart
- User purchase history, including the number of orders or total spend
- Certain customer data
Other Personalization Rules
You can also mix in other personalization conditions, either as standalone rules or as additions to your WooCommerce content personalization rules. This includes:
- Geolocation – for example, you could display different products to people in different areas.
- Where the visitor came from – for example, you could display different products or a special offer to people who clicked a certain ad or came from a certain referring site.
- User details – for example, you could display special offers to registered members on your site or even users with a specific user role.
- User behavior – for example, you could display a special offer to people who are visiting your site for the first time.
Logic Hop also works with content from any editor. You can use it to personalize content from the native WordPress editors as well as popular page builder plugins like Elementor and Divi.
It also works within the WooCommerce product description boxes, so you can actually personalize your WooCommerce product descriptions if needed.
How to Set Up WooCommerce Dynamic Content Personalization
Now, let’s get into how you can personalize your WooCommerce store’s content with Logic Hop.
While there are an almost infinite number of ways that you can personalize your store, I’m going to focus on a specific example – recommending a sunglass case product to users who have already purchased a pair of sunglasses.
With that being said, once you learn the basic principles, you’ll be able to use the same steps to create your own unique personalization scenarios.
Basically, this method is by no means limited to the example that I’ve chosen.
Let’s dig in…
1. Set Up Your WooCommerce Store In Its Default State
Before you can start personalizing anything, you’ll first want to make sure that you’ve set up your store in its default state.
This is what shoppers will see if they don’t meet any of your dynamic content rules.
If you already have a WooCommerce store, you’ve probably already set this up. But if not, make sure your store’s content is fully in place before you move on.
For some help, check out our guide on how to create a WooCommerce store.
2. Install and Activate Logic Hop
Now, you’re ready to install the Logic Hop plugin. While it is a premium plugin, you can try it out with a 14-day free trial if you’re not ready to commit to purchasing a plan yet.
Once you activate the plugin, go to Logic Hop → Settings and add your domain name and license key to finalize the activation.,
Beyond the core plugin, you’ll also want to install the official Logic Hop WooCommerce integration plugin from WordPress.org so that you can set up your eCommerce-specific rules.
You also might want to install some of the other Logic Hop integrations, which can help you connect to page builder plugins as well as some email marketing services and CRMs. They’re all available at WordPress.org – here’s the full list:
- Elementor integration
- Divi integration
- Beaver Builder integration
- Gravity Forms integration
- HubSpot integration
- Drip integration
- ConvertKit integration
3. Configure Basic Logic Hop Settings
Once you’ve installed Logic Hop and the necessary integration plugins, you’ll need to configure Logic Hop’s basic settings when it comes to things like geolocation and cookie setting.
Thankfully, you don’t need to do this manually – you can just use one of the preset configurations.
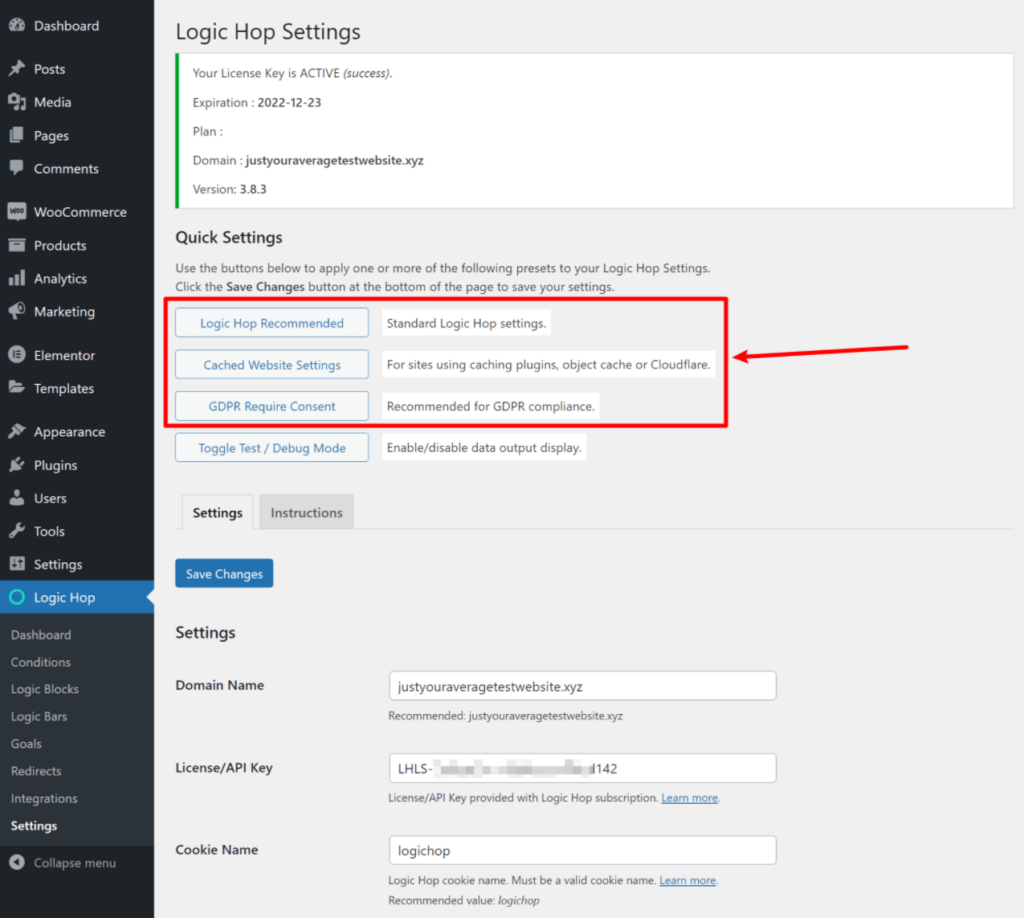
Go to Logic Hop → Settings and choose the “Quick Setting” that applies to your store.
The Logic Hop Recommended settings are a good starting point but you might want to choose one of the other options if they apply to your site.
4. Create Your Dynamic Content Rule(s)
Next up, you need to create your dynamic content rules, which Logic Hop calls Conditions.
You can also do this on the fly when you’re working in the editor, but I find it easier to keep track of things if you create your personalization rules separately and then just assign them in the editor.
To create your first rule, go to Logic Hop → Conditions → Add New. Give it a name and a description – these are internal and help you remember what it does.
For this example, remember that we want to recommend a sunglass case to users who already purchased a pair of sunglasses from the store.
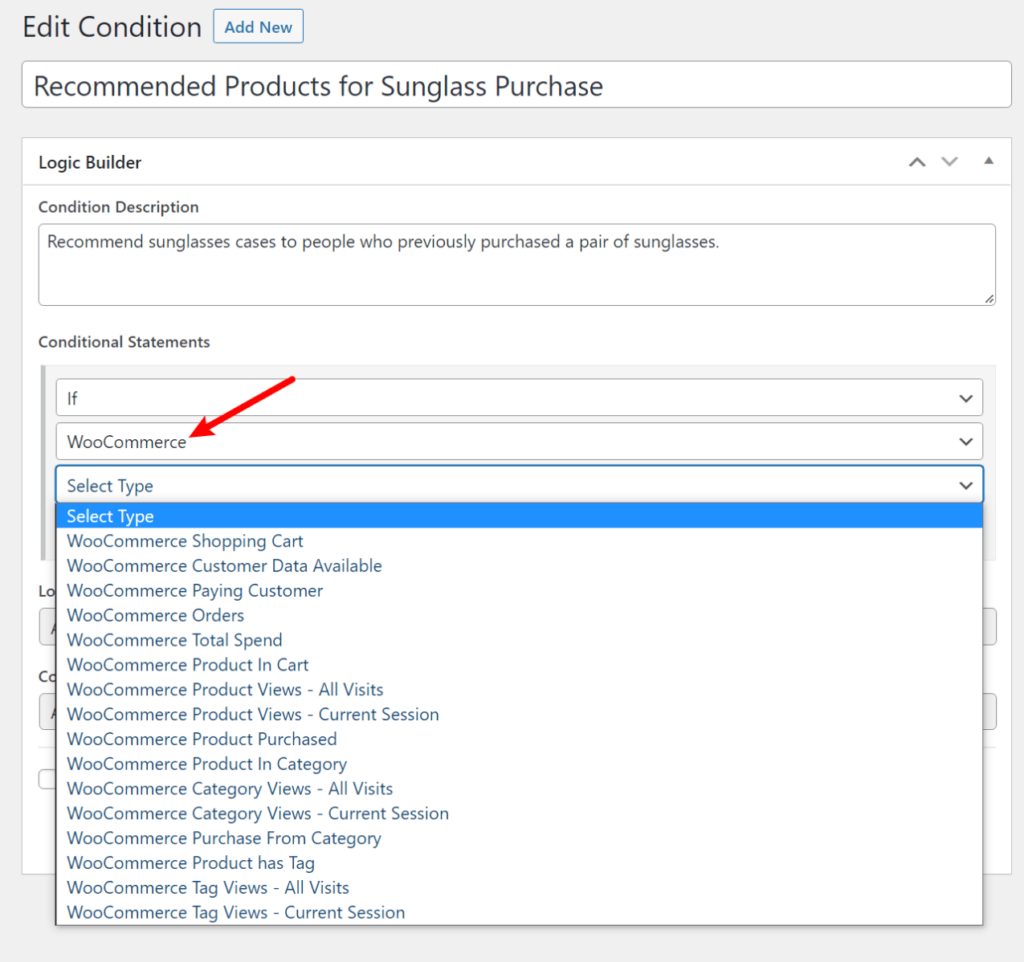
Then, you can use the Conditional Statements drop-down to add one or more rules. You’ll find all of the WooCommerce-specific rules in the WooCommerce section.
Once you choose that, you’ll get another drop-down with all of the WooCommerce rules:
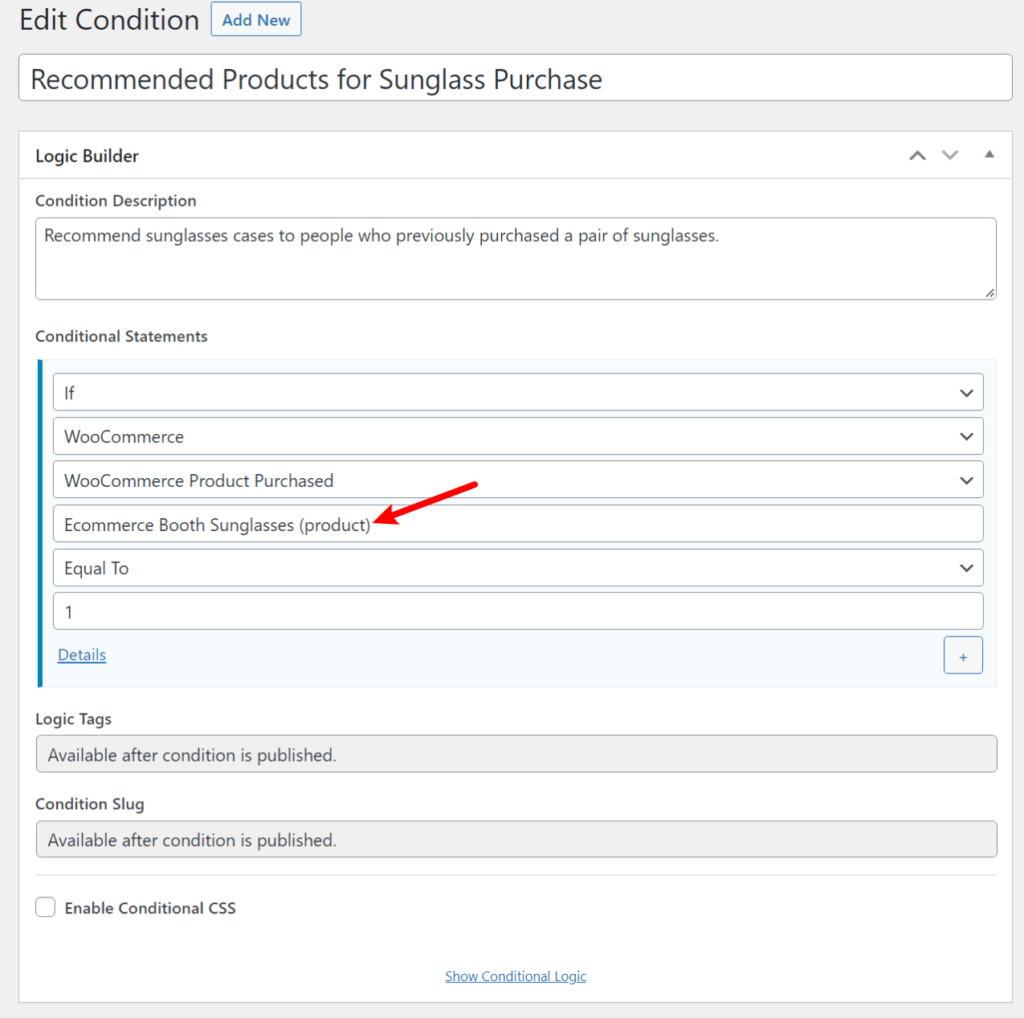
For this example, you would choose WooCommerce Product Purchased. Or, you could select an entire category of products if you have an entire sunglass product category.
Then, you can select the specific product and the number of times a shopper must have purchased that product to trigger the rule:
If you want to get even more specific, you can add additional rules using the plus icon.
For example, if you only want to run this rule during the summer, you could add time-based rules to target specific months:
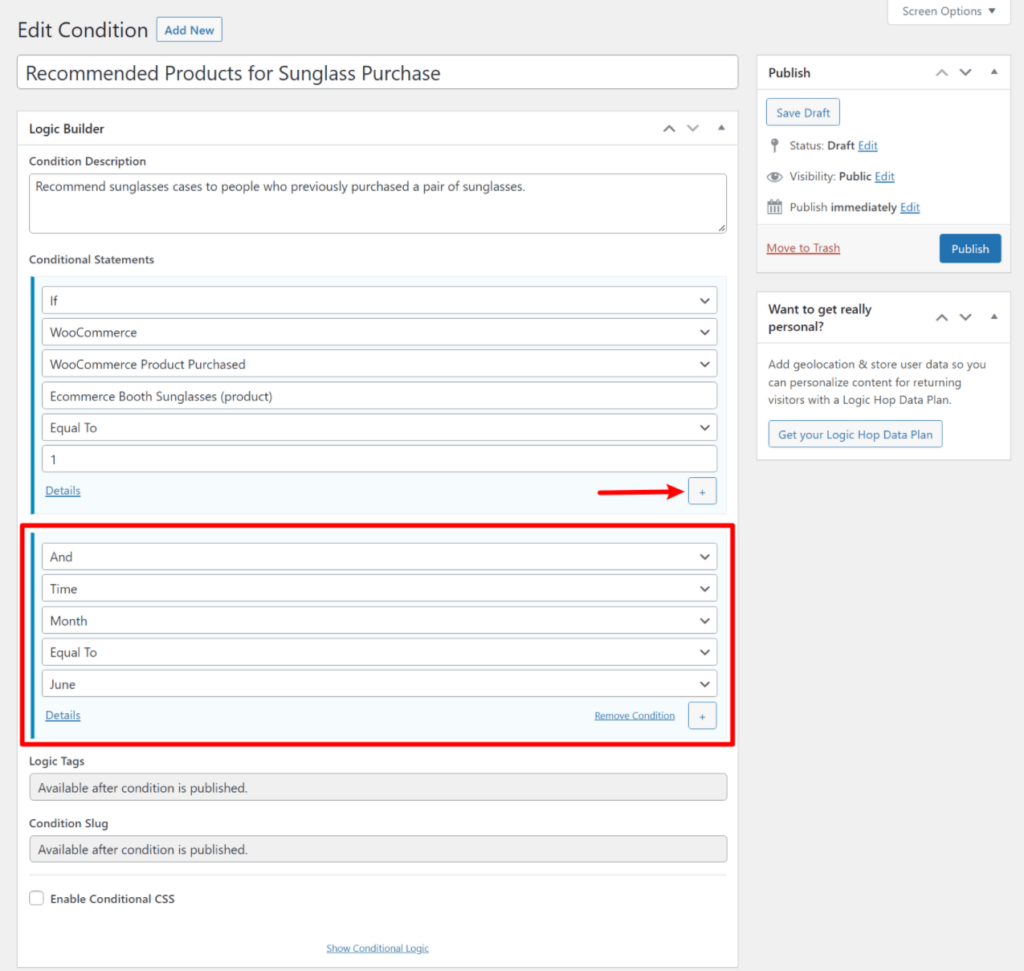
Once you’re happy with how the rule works, make sure to Publish it.
If you want to create additional WooCommerce personalization rules, you can repeat the same process to create unlimited rules.
5. Personalize Your Store Using Your Rule(s)
Once you have your rules, you can start using them to personalize your store’s content.
You have a few different options here:
- Personalize content – you can personalize the content that appears in your store’s editor, whether that’s the native WordPress block editor, a page builder plugin, the TinyMCE product editor, or anything else.
- Create a notification bar (Logic Bar) – you can create a special notification bar that displays to people who meet your rule. This is great for promoting coupons or deals.
- Redirect users – you can redirect users who meet certain rules to a specific page.
Let’s look at personalizing content first and then I’ll show you the other options.
For content personalization, I’ll show you how it works in the native block editor, Elementor, and the WooCommerce product editor.
Adding Dynamic Block Editor Content
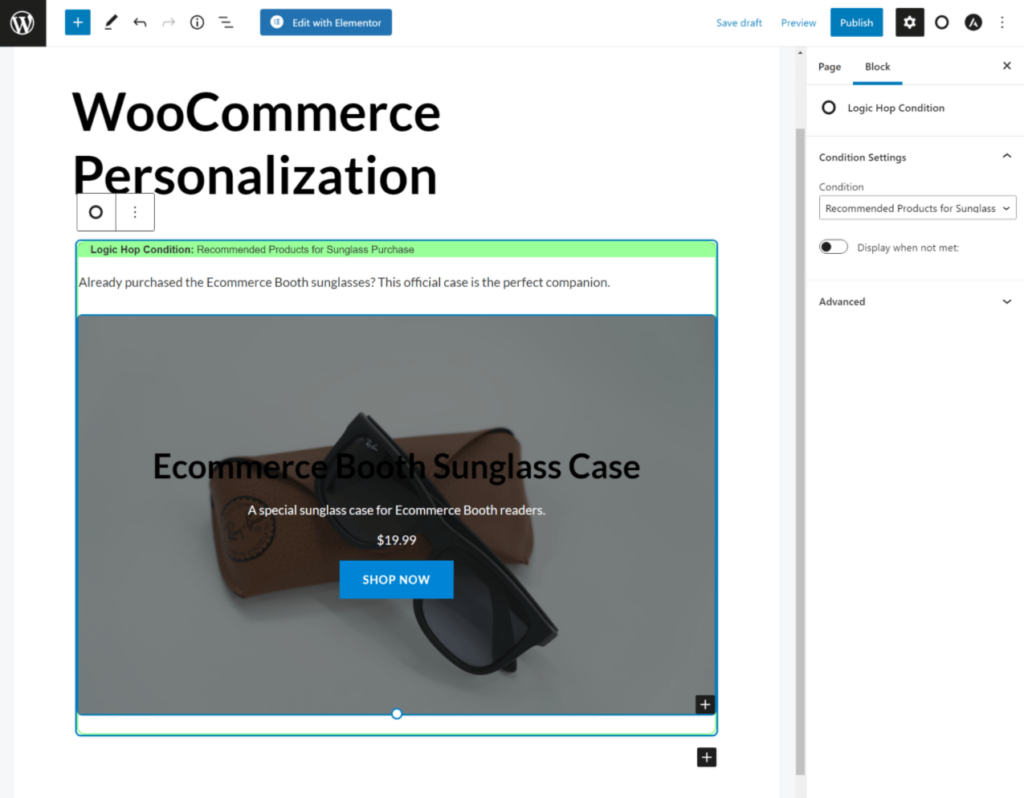
If you’re using the native WordPress block editor, you can insert your personalization rules by adding the Logic Hop Condition block. Any blocks that you place inside the condition block will only display to users who meet the condition.
For this example, you would first add the Logic Hop Condition block and select the condition that you created in the previous step:
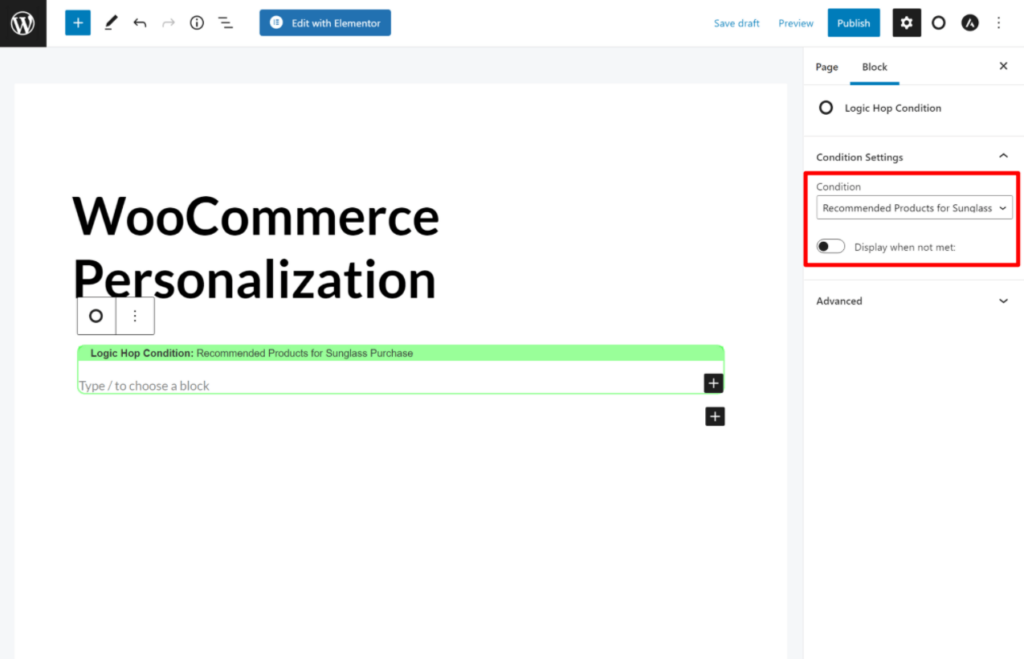
Then, you could add some text and a WooCommerce product block inside to display the sunglass case to people who already purchased a pair of sunglasses:
Adding Dynamic Elementor WooCommerce Content
If you’re using Elementor (or another popular page builder plugin like Divi Builder), Logic Hop offers dedicated integrations that let you use the same approach from inside the page builder.
In Elementor, you’ll get a new Logic Hop setting in the Advanced tab of any section, column, or widget that lets you apply a condition:
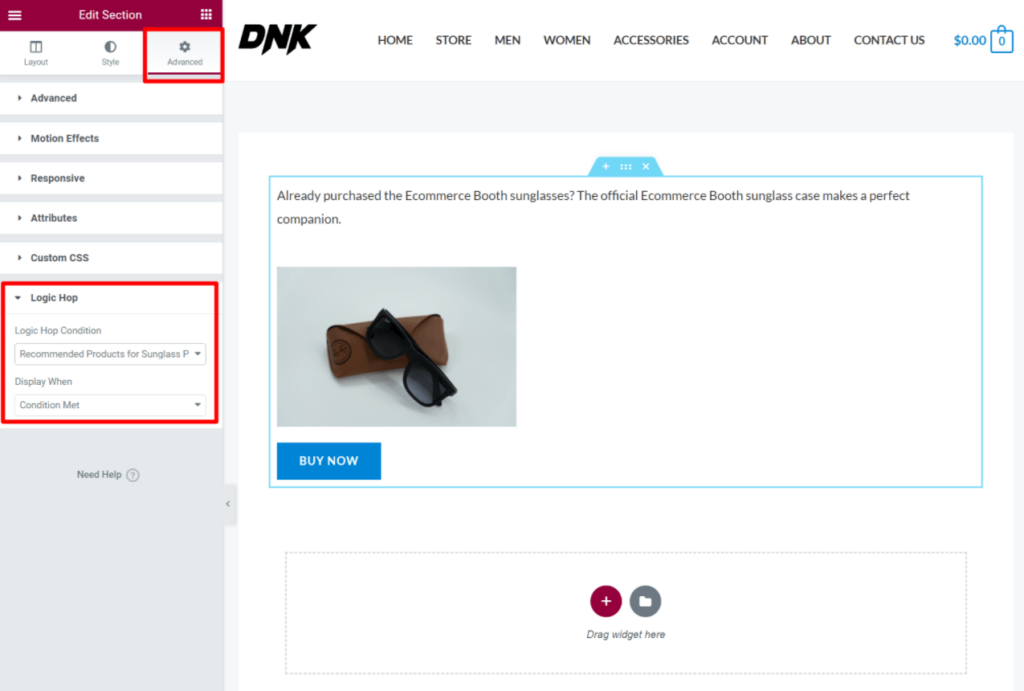
If you don’t see these rules, make sure you’ve installed the Logic Hop Elementor integration plugin.
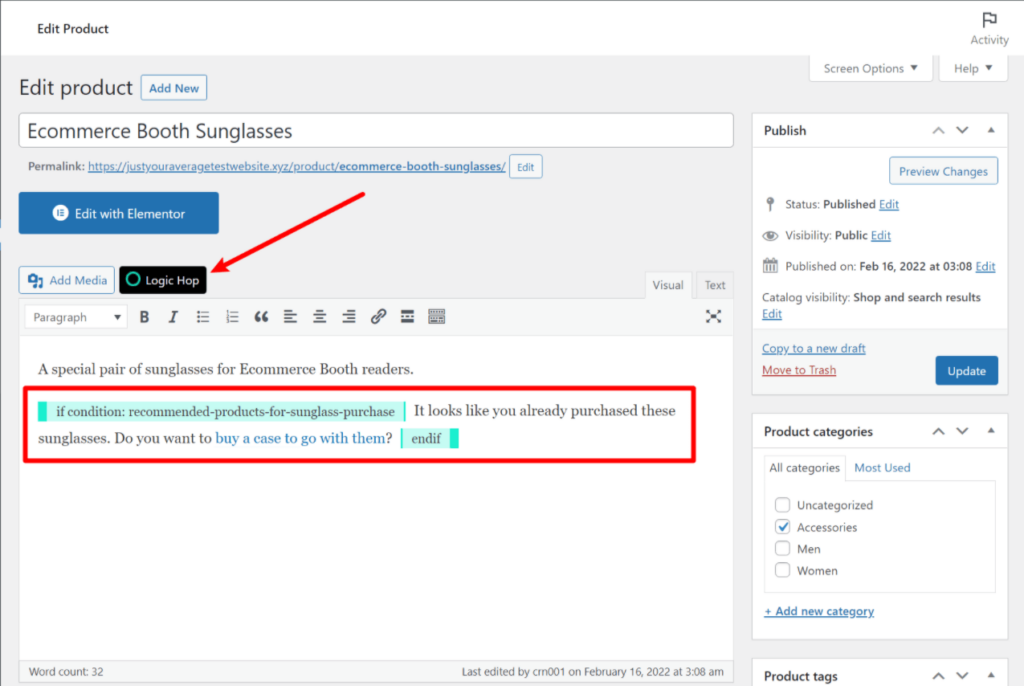
Adding Dynamic Content to WooCommerce Product Description
It’s worth noting that you can also personalize content in your product descriptions. While that’s not really relevant to the example that we’ve chosen, it can be helpful for other types of WooCommerce personalization.
Because the WooCommerce product editor still uses the Classic TinyMCE editor, you’ll need to do this via Logic Hop’s shortcode builder, which you can access using the button above the editor:
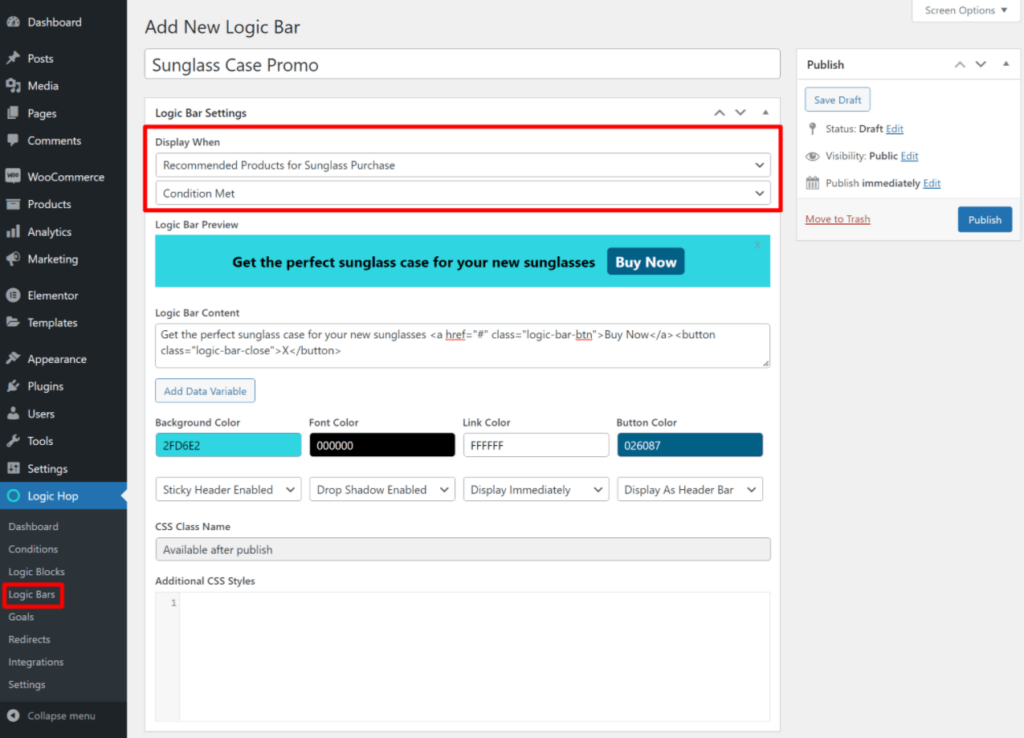
Creating Dynamic Notification Bars (Logic Bars)
If you want to create a personalized notification bar, you can go to Logic Hop → Logic Bars → Add New.
Then, you can select the condition and customize the content of the notification bar:
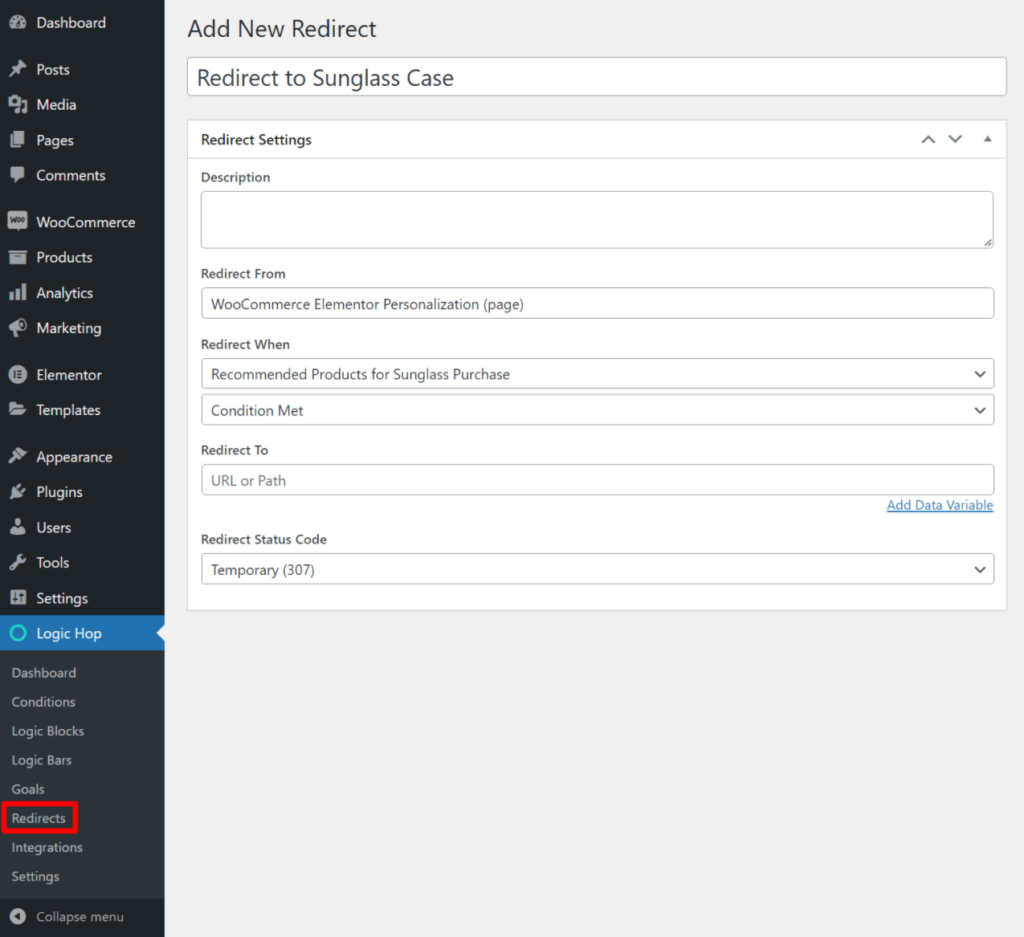
Setting Up Dynamic WooCommerce Redirects
If you want to set up a redirect based on your logic condition, you can go to Logic Hop → Redirects → Add New:
Set Up WooCommerce Personalization Today
If you have a WooCommerce store, showing personalized content or product recommendations is a great way to create a more user-friendly store and boost your conversion rates.
With the Logic Hop plugin, you can easily set up simple or advanced WooCommerce personalization strategies without needing any technical knowledge.
You can set up your conditional rules using a bunch of general and WooCommerce-specific conditions. Then, you can apply those rules directly in the editor, whether you’re using the native WordPress editor or a page builder.
Or, advanced users can also add rules directly to theme template files.
If you want to get started, install the Logic Hop plugin on your store today. While it is a premium plugin, you can test it out at no risk to your wallet thanks to a 14-day free trial.
For some other ways to improve your store’s revenue, check out our guides to boosting average order value and increasing sales and loyalty.
Do you still have any questions about WooCommerce personalization? Let us know in the comments.
Leave a Reply